How to Make an Image Transparent Online (Free, No Software)
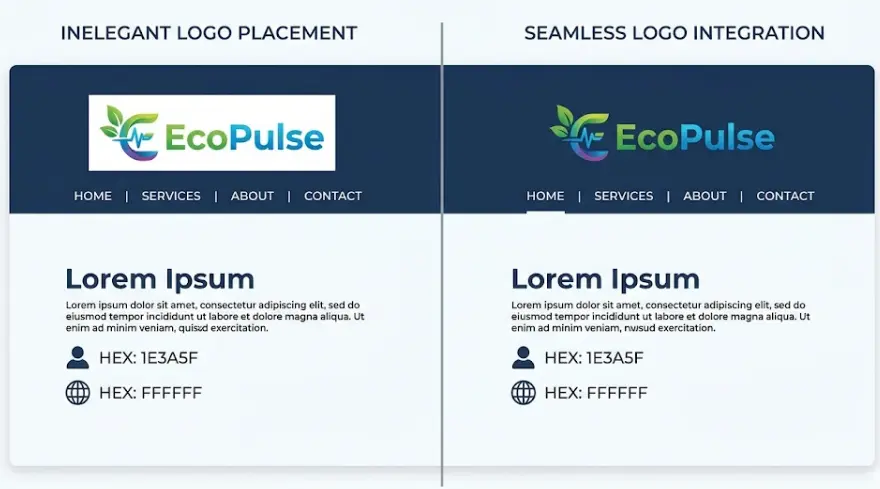
Many of you have checked on different products and website showing transparent logos which looks like a wao,but and the other hand have you ever placed a logo on a colored background and ended up with an ugly white box sitting around it that is a transparency problem.
This situation mostly happen when you try to add logo on website,photos on product, creating a WhatsApp sticker, or putting together presentation. Most of people add photo with include background don’t know first to make transparent image.
A transparent image is one where the background has been completely removed not replaced with white, not filled with black, just gone. Whatever sits behind the image shows through cleanly. Now This complete guide will learn you how to add transparent image logo on your desired thing without paying any cost,
What Does Image Transparency Actually Mean?
Every single image is made up of pixels tiny colored dots. In a transparent image, some of those pixels carry no color at all. They are essentially invisible, which is why the area behind them shows through. This invisible property is called an alpha channel, and it is what separates a transparent image from a regular one.
The most important thing you must know before performing any task that JPG files do not support transparency. The format simply was not built for it. If you remove the background from a JPG image and save it back as JPG, the empty area turns white automatically. To preserve transparency, you must save the file as PNG. This is the single most common mistake people make when working with transparent images getting the process right but saving in the wrong format.
When Do You Actually Need a Transparent Image?
More often than you might think. Here are the most common situations:
- Business logos: A logo should work on any background color, whether that is a white website, a dark social media banner, or a printed document. A transparent background makes this possible without any extra editing.
- Product photos for marketplaces: Platforms like Daraz and Amazon expect clean, professional product images. A cutout product on a plain or styled background looks far more polished than one with a visible white square around it.
- WhatsApp and Telegram stickers: Both platforms require transparent PNG files for stickers. Without transparency, the sticker just looks like a regular photo.
- Social media watermarks: Placing your name or logo on photos without a background box gives it a professional, clean finish.
- Presentation graphics: Dropping an image onto a colored PowerPoint or Google Slides background without white borders makes everything look intentional rather than pasted together.
- YouTube thumbnails: Transparent cutouts of faces, objects, or text elements let designers layer them over any background freely.
- Printed materials: Brochures, business cards, and flyers often need logos or graphics that sit on colored areas without a background clash.
The Two Best Free Methods
There are several tools website available online, but two stand out consistently for reliability, ease of use, and quality of results. Both are free.
Method 1: Remove.bg — Fastest Option for Most Images
Remove.bg uses AI to detect and remove backgrounds automatically in professional format. You upload an image, and within a few seconds the background is gone. There is no brushing, selecting, or manual input required for most images. It handles portraits, product photos, and logos particularly well.
Step-by-step:
- Open remove.bg in your browser.
- Click “Upload Image” and choose your photo or logo file.
- The AI processes the image automatically this usually takes under 10 seconds.
- Preview the result and zoom in to check the edges carefully.
- If any areas need fixing, use the brush tool to erase or restore parts of the image.
- Click “Download” and save the file as PNG.
One tip: Remove.bg handles hair and fine edges better than most competing tools. Still, always zoom in on the edges before downloading especially around fur, hair, or intricate details.
Method 2: Canva Background Remover — Best for Logos and Design Work
Canva is primarily a design tool, but its background remover works well — particularly for logos and simple graphics with clean, solid-color backgrounds. The feature is available on the free plan.
How to use it:
- Go to canva.com and open a new design or upload your image.
- Click on the image to select it.
- In the top toolbar, click “Edit Image”.
- Select “Background Remover” from the panel on the left.
- Canva removes the background within a few seconds.
- Download the result as PNG.
The practical advantage of Canva is that if you are already building something there a social media post, a banner, a presentation slide you can remove the background and use the result directly in the same design without switching between tools.
Making Only Part of an Image Transparent
Sometimes the goal is not to remove the entire background but to make one specific area of an image transparent. For this, you need a tool with manual brush selection rather than automatic AI removal.
Both Canva and Photoscissors let you paint over specific regions to erase them manually. This is useful when, for example, you want to remove an object in the middle of an image while keeping the background, or when the subject and background share similar colors that confuse the AI.
Manual selection takes more time but gives more precise results. For most backgrounds that are a solid color or clearly separate from the subject, the AI tools handle it just fine.
Placing a Transparent Image onto a New Background
Creating the transparent PNG is usually only half the job. Most of the time you then need to place that cutout onto a different background a product on a lifestyle scene, a logo on a banner, or a person in front of a new setting.
CombineJPG.com handles this step cleanly and for free. Upload your background image first, then upload your transparent PNG on top, position and resize as needed, and download the merged result. The tool correctly handles PNG transparency, so the cutout blends naturally with whatever background you choose.
This is a common workflow for sellers on Daraz or similar platforms: photograph the product on a plain background, remove the background with Remove.bg, then place the product cutout onto a styled scene using CombineJPG. The whole process takes about five minutes and requires no design software.
Common Mistakes to Avoid
Saving as JPG instead of PNG:
- This is the most frequent mistake. The moment you save a transparent image as JPG, the transparency is lost and the empty area fills with white. Always choose PNG when downloading.
Skipping the edge check:
- AI tools can leave rough or jagged edges, especially around hair, fur, or fine fabric. Zoom in to 100% before downloading and fix any problem areas with the brush tool.
Not checking the result in context:
- A transparent image looks fine on a white background but may reveal flaws when placed on a dark or patterned background. Test it in the actual environment before you finalize.
Using transparent images in software that does not support them:
- Some older email clients and certain software display transparent areas as black. In those cases, export a version with a white or colored background specifically for that use.
Over-relying on AI for complex images:
- When the subject and background have similar colors or lots of overlapping detail, AI tools make errors. Use manual selection tools for these cases.
Also Read: How to Remove Background From a Photo Online Free
Always Save as PNG — No Exceptions
This point is notable its own section because it causes so much confusion. PNG is the only widely supported image format that preserves transparency. JPEG does not. WebP can, but not all platforms handle it consistently. GIF supports only single-color transparency and is not suited for most use cases.
When you upload a transparent PNG to Canva, to your website, or to most design tools, the transparency is preserved. When you merge it with another image using a tool like CombineJPG, the result comes out clean. The only time you should convert to JPG is if the final image has a solid background and you need a smaller file size.
Wrapping Up
Making an image transparent is not a complicated process once you know the steps. Use Remove.bg or Canva to strip the background, save the result as PNG, and your transparent image is ready to use wherever you need it websites, presentations, stickers, printed materials, or product listings.
If you need to place the cutout on a new background, CombineJPG handles that cleanly in a few clicks. The entire workflow is free, runs in any browser, and requires no prior design experience.
Also Check: How to Create a Before and After Photo Comparison Online
Frequently Asked Questions
Does removing the background reduce image quality?
No. The subject of the image stays at full original quality. Transparency only affects the background pixels the part you wanted gone anyway. As long as you save as PNG, there is no quality loss.
Can I make a JPG logo transparent?
Yes. Upload the JPG to Remove.bg or Canvas’s background remover. The tool identifies and removes the background. Just make sure to download the result as PNG, not JPG otherwise the transparency will not be preserved.
Why does my image still show a white background after downloading?
Almost certainly because it was saved as JPG. Go back to the tool, re-download the file, and specifically select PNG as the format. The white background will disappear.
Can I do this on a mobile phone?
Yes. Both Remove.bg and Canva work in mobile browsers, and Canva has a mobile app as well. The process is identical — upload the image, remove the background, download as PNG.
How do I know if the transparency worked correctly?
When you preview the image in Remove.bg or Canva, the transparent areas appear as a checkered gray-and-white pattern. That checkerboard is the universal visual indicator of transparency. If you see it, the transparency is there.
Is there a free option for images with complex or messy backgrounds?
Remove.bg handles most complex backgrounds well. For cases where the AI struggles like a subject wearing clothes that match the background color try Photo scissors, which gives you more manual control over the selection.