What is DPI and Why It Matters When You Merge Images
Many of users mostly search merged five photos into one JPG file, but not can get the perfect online free tools there are many excellent working tools are available but mostly are paid or limited features. Some of tools claims that offers free merging jpg facility on your computer screen but when you print that merged image, the text is blurry, the edges are fuzzy, and one photo looks tiny while another looks stretched. What went wrong?
The simple answer is DPI
If you don’t understand DPI before merging images, you are compromising with quality. Let me explain what DPI actually means and why it saves your work every single time.
What Does DPI Actually Mean?
First of all you should know about DPI stands for Dots Per Inch.
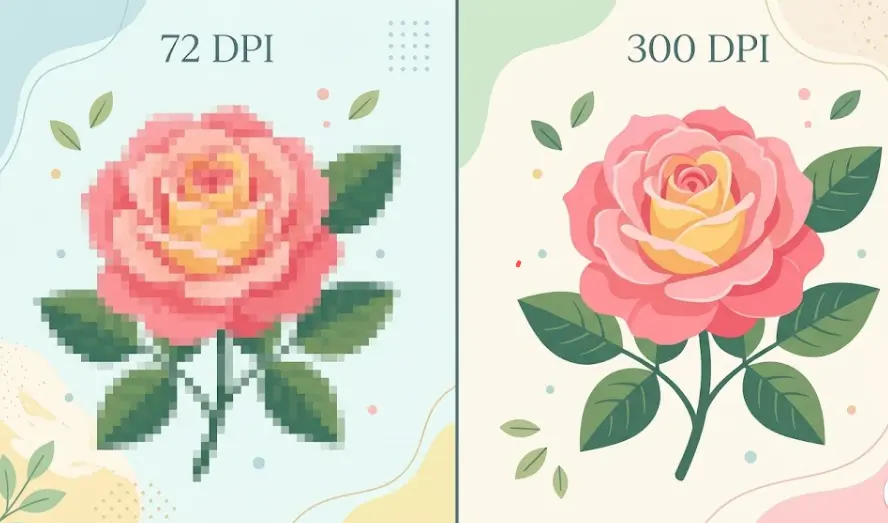
Before merging jpgs into single file you should must know about it: Imagine drawing a one-inch square on paper. Now fill that square with tiny dots. If you fit 72 dots in that inch, that is 72 DPI. If you fit 300 dots in that inch, that is 300 DPI.
More dots per inch = sharper image. Fewer dots = blurry image.
Think of DPI like a net. A net with 300 knots per inch catches all the details. A net with only 72 knots per inch lets most of the detail fall right through. When you merge images, each image brings its own net. If one image has 300 knots and another has 72, your final merged file cannot magically fix the loose one.
Important note: DPI only matters for printing. On a screen (phone, laptop, TV), your device ignores DPI and just stretches pixels. But the moment you print your merged image, DPI becomes the boss.
Standard DPI Values and When to Use Them
Every project do not need the exact DPI. Here is a simple guide to help you choose before you merge your images.
| DPI Value | Best For | What Happens |
|---|---|---|
| 72 DPI | Web pages, social media, email attachments | Looks fine on screens. Prints very poorly. |
| 150 DPI | Draft prints, newsletters, cheap flyers | Acceptable for small prints. Visible pixelation on A4. |
| 300 DPI | Professional printing, photo albums, brochures | Standard for high quality. Sharp text and photos. |
| 600+ DPI | Fine art, medical scans, professional publishing | Overkill for most people. Huge file sizes. |
Real example: If you merge three 72 DPI images and print them on A4 paper, each image will look like a set of fuzzy Lego blocks. You will see every pixel. If you merge three 300 DPI images, each face, logo, and line will stay crisp.
How DPI Affects Your Merged JPG Files Quality
When you merge images online, the tool usually keeps the lowest DPI in the group. It does not average them. It does not upgrade the small one.
Let me show you what happens when you perform task:
- Scenario A: You merge two 300 DPI images. Result = sharp 300 DPI merge.
- Scenario B: You merge one 300 DPI image and one 72 DPI image. Result = blurry 72 DPI merge.
Why this is? Because the merging tool must fit all images into one canvas. It cannot invent dots that do not exist. The 72 DPI image has very few dots per inch, so everything else gets reduced to match it.
That is the main reason checking DPI before you merge is not optional. It is the difference between a professional result and junk you throw in the recycling bin.
Another problem: size mismatch. A 300 DPI photo might be 3000×2400 pixels. A 72 DPI web image might be 600×400 pixels. When you merge them, the small photo becomes a tiny stamp or gets stretched into a blurry nightmare.
How to Check DPI of Your Images Before Merging
Before merging the images you must check the DPI for this task you don’t need any type of expensive software . Here are three easy ways to check DPI on any computer.
On Windows:
- Right-click the image file
- Click Properties
- Click the Details tab
- Look for Horizontal resolution and Vertical resolution
On Mac:
- Open the image in Preview
- Click Tools in the top menu
- Select Show Inspector
- Look for DPI under Image DPI
Check DPI On any phone or tablet:
You cannot easily view DPI on mobile. Instead, email the image to yourself or upload it to Google Drive, then check from a computer. Or use a free online DPI checker tool before you merge.
Pro tip: If you see “96 DPI” or “72 DPI” on images from social media or WhatsApp, those are screen-only files. Never merge them with high-resolution photos unless you want to ruin the whole batch.
Recommended DPI for Different Uses
Before you click that merge button, ask yourself: Where will this merged image live?
For web use (blogs, email banners, social media):
Stick to 72 DPI. Higher DPI just makes your file size bigger and your page slower. Screens do not care about DPI. Keep it light.
For print use (flyers, posters, photo books):
Use 300 DPI for every single image you merge. Do not mix DPI values. Convert all images to 300 DPI first using a free tool or simple photo editor.
For social media print-on-demand (T-shirts, mugs, phone cases):
Use 300 DPI minimum. Many print shops require 300 DPI. Some ask for 450 DPI for very small products. Check their requirements before you merge.
For office documents (internal reports, notice boards):
150 DPI is usually fine. Nobody expects magazine quality in a breakroom flyer. But if that flyer includes your logo, use 300 DPI for the logo layer.
Conclusion
DPI is not complicated for each once you understand the one key rule: All images in a merge should share the same DPI.
If you print a 72 DPI image on A4 paper, it will look pixelated and unprofessional. If you feed a mix of DPI values into any merging tool, the lowest one wins and not in a good way.
That is why you should use a tool that keeps things simple. When you are ready to merge your images, try combinejpg.com. It handles JPG merging without silently destroying your DPI settings. Just make sure your input images all share the same DPI before uploading, and your final merged file will print exactly as you expect.
Check your DPI first. Merge second. Print with confidence.
FAQ
Can I increase the DPI of an image after I merge it?
No. You cannot create detail that does not exist. If you have a 72 DPI merged image and you change it to 300 DPI in adobe Photoshop, the file size will increase but the quality will stay blurry. Think of it like stretching a small T-shirt to fit a large person it covers more area but fits terribly. Always start with high DPI before merging.
Does DPI affect file size when I merge images online?
Yes. Higher DPI means more dots per inch, which means more data per image. Merging three 300 DPI images will produce a much larger JPG file than merging three 72 DPI images. That affects upload time, download time, and email attachments. For print, accept the large size. For web, keep it small.
What happens if I mix 150 DPI and 300 DPI images in one merge?
The final merged image will default to the lowest DPI in the batch in this case, 150 DPI. Your 300 DPI image will lose half its dots to match the weaker one. The result is a merged file that prints noticeably softer than it could have been. Always convert all images to the same DPI before you merge